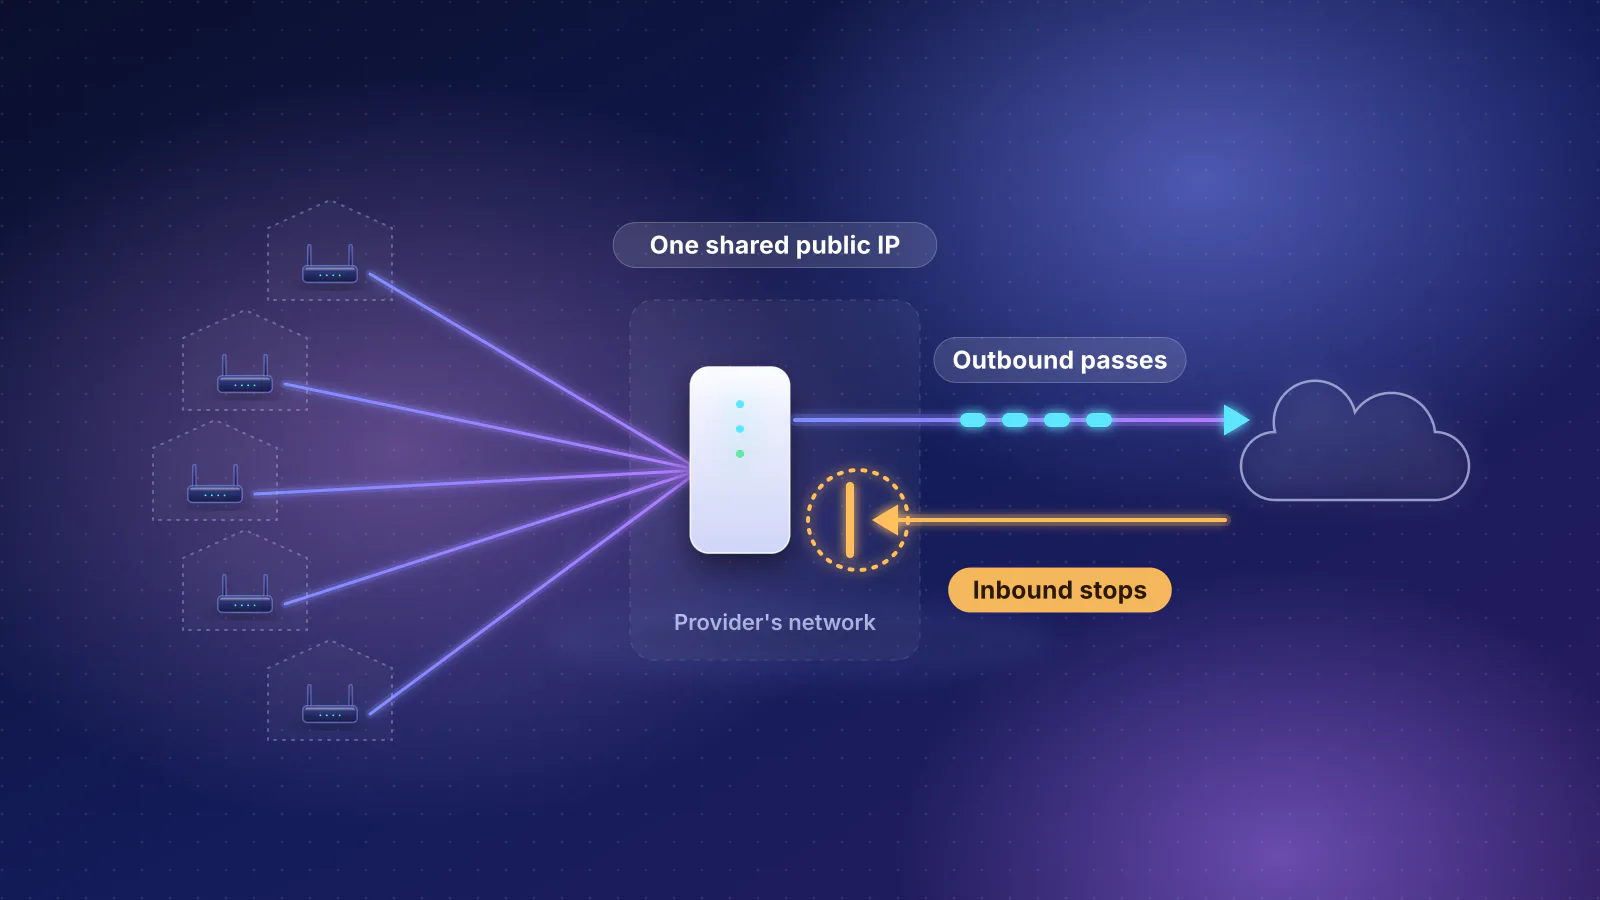
The short version
- Everything that works behind carrier-grade NAT either starts the connection from inside your home or takes the shared IPv4 address out of the path. Outbound options: a mesh VPN (Tailscale, ZeroTier), a WireGuard tunnel from home to a rented server, Cloudflare Tunnel, or a maker's cloud service (UniFi Teleport, Synology QuickConnect, Home Assistant Cloud). Options that avoid the shared address: IPv6 inbound, or a public IPv4 address bought from the provider.
- For most homes, a mesh VPN is the first thing to try. Tailscale's free Personal plan covers up to 6 users and unlimited user devices, needs no open port, and one always-on device at home can give your phone the whole home network. The catch: every remote device needs the app.
- Direct or relayed decides speed. Mesh VPNs and QuickConnect connect directly when the NATs allow it and fall back to a relay when they don't; a rented WireGuard server, Cloudflare Tunnel and Home Assistant Cloud carry every packet. Tailscale says its DERP relay servers "are generally slower than direct connections and may offer lower maximum throughput".
- Cloudflare Tunnel suits web apps and people who won't install anything, with Cloudflare Access as the login. Other protocols need software on the client, and Cloudflare's terms require a paid service for video, so it's the wrong tool for Plex or Jellyfin.
- Don't put an admin page on the internet. Where a login page has to be public, use multi-factor authentication and expose one app, not the whole network.
This article assumes you've confirmed the problem. If you haven't, the three-minute check in CGNAT explained tells carrier-grade NAT apart from double NAT, which you can usually fix yourself with bridge mode or IP passthrough. This article is about getting around the provider's NAT, not about how it works.
The options side by side
Costs come from each service's own pricing or help pages, checked November 7, 2026. "Setup effort" is RouterHaus's rating from the steps each maker documents: low means an app and an account, moderate means a domain, router setting or Linux routing step, high means you build and maintain a server.
| Option | Works behind CGNAT? | Path | Each remote device needs | Cost class (maker's page) | Setup effort |
|---|---|---|---|---|---|
| Tailscale | Yes, no inbound port | Direct when NAT traversal succeeds; Tailscale's DERP relays or your own peer relay otherwise | Tailscale app, signed in | Free Personal plan: up to 6 users, unlimited user devices, subnet routers and exit nodes included | Low |
| ZeroTier | Yes, no inbound port | Direct when possible; relayed through ZeroTier's root servers otherwise | ZeroTier app | Free Personal plan: 10 devices, one network, non-commercial use | Low; moderate for whole-LAN access |
| WireGuard to a rented server | Yes: home dials out to the server | Always through the server | WireGuard app | WireGuard is free; the server is a paid rental at the host's price | High |
| Cloudflare Tunnel with Access | Yes, outbound only | Always through Cloudflare | A browser for web apps; cloudflared or Cloudflare's client for other protocols | Zero Trust Free plan, $0, 50-user limit; you need your own domain on Cloudflare | Moderate |
| IPv6 inbound | Only if the provider gives you IPv6 and your router can allow the connection | Direct | Nothing extra, but the network it's on must have IPv6 | No add-on documented; Starlink includes IPv6 on every plan | Moderate |
| Public IPv4 from the provider | Removes the CGNAT | Direct | A VPN app, if you run a VPN server on your router | Provider-dependent; some don't offer it (see the provider table) | Low once you have it |
| UniFi Teleport | Ubiquiti says yes, "when both the UniFi gateway and client are behind NAT"; may need IPv6 on the gateway's WAN | Not documented | WiFiman app | No fee mentioned; needs a UniFi gateway running UniFi OS | Low |
| Synology QuickConnect | Yes, with the relay option on | Direct when possible; Synology's relay otherwise | Synology apps or a browser | No fee on Synology's help page; needs a Synology Account | Low |
| Home Assistant Cloud | Yes, no open ports | Always through Nabu Casa's proxy servers, encrypted end to end | A browser or the Home Assistant app | $6.50 a month or $65 a year (USD, before tax), 31-day free trial | Low |
Which one for your case
- Plex or Jellyfin for your own household: a mesh VPN on the server. Jellyfin's Tailscale page lists "No Public IP or additional servers required" as the advantage and "Every client needs to have the Tailscale software installed" as the cost. Plex may still class a VPN connection as remote, so its remote-playback rules can apply (see exposing a media server safely).
- Plex or Jellyfin for friends who won't install an app: a public IPv4 address with a port forward to Plex, or to a reverse proxy in front of Jellyfin (Jellyfin calls forwarding its own ports directly "not recommended!"). Without a public address, Jellyfin also documents a reverse proxy on a rented server that reaches your home network (a WireGuard tunnel can make that connection). Plex's own Relay works without either but caps streams at 2 Mbps (details). Skip Cloudflare Tunnel and Tailscale Funnel for video: see their limits.
- Home Assistant: Home Assistant's documentation calls Home Assistant Cloud "the easiest and safest option for most people". It also calls a VPN "such as Tailscale or ZeroTier One" "a secure way" in, with one catch for the phone app: "without this connection, your sensors will not update in Home Assistant."
- NAS files (SMB shares, sync, photos): a mesh VPN, so the NAS's file sharing never faces the internet. On a Synology, QuickConnect covers Synology's own apps. Cloudflare says that to move large files through a tunnel privately, "use a private network route instead" of a public hostname.
- Cameras and a local recorder: reach the recorder over a mesh VPN, or through the NAS maker's app (Synology lists Surveillance Station among the packages QuickConnect supports). Never forward camera ports. If your cameras sit on their own network, advertise only the recorder to remote devices, not the camera network.
- Everything on the home network (printer, router admin, a PC): a Tailscale subnet router, a ZeroTier managed route, UniFi Teleport if you have a UniFi gateway, or a WireGuard relay that routes your home subnet. Then restrict who can reach what (security).
- A second home or office: a subnet router at each end, or UniFi SD-WAN if one of the two gateways has a public IP address.
Mesh VPN overlays: Tailscale and ZeroTier
Both put an app on each device and build a private network from outbound connections, which the provider's NAT lets through, connecting devices directly where they can and through a relay where they can't.
Tailscale
Tailscale's documentation says that "in most environments, Tailscale successfully establishes direct connections, but some network configurations (hard NAT) can prevent this and force Tailscale to use relayed connections instead." The relays are its DERP servers, which Tailscale says "blindly" forward "already-encrypted traffic from one device to another", so "it's impossible for a DERP server to decrypt your traffic". Tailscale gives no DERP throughput figure. As CGNAT explained notes, none of the providers RouterHaus checked documents whether its CGN behaves the way NAT traversal needs, so you find out by checking.
Check your path with tailscale status, which marks each device "direct" or "relay", or tailscale ping: a reply "via DERP(nyc)" is relayed, one via an IP address and port is direct.
Peer relays let a device in your own tailnet act as a relay, tried before DERP; Tailscale calls them "high-throughput relay servers". The relay needs Tailscale 1.86 or later and "at least one configurable UDP port" that the other devices can reach. A device at a CGNAT home can't offer that to the outside, so a helpful peer relay would have to sit somewhere reachable, such as a rented server (RouterHaus's reading of the requirements; Tailscale doesn't describe this case). The free plan includes them.
Reaching devices that can't run Tailscale. A subnet router is "a device in your tailnet that you use as a gateway to advertise routes to other devices", for things like printers that can't run the app. (An exit node is different: it sends all of a device's internet traffic out through your home.) Both are on the free plan.
Tailscale's Funnel, which Tailscale says is "currently in beta", publishes one service to the public internet for people without Tailscale. It "can only listen on ports 443, 8443, and 10000", "only works over TLS-encrypted connections", and "is subject to non-configurable bandwidth limits" that Tailscale doesn't state: fine for a small web app, not a media server.
Setup outline (from Tailscale's subnet router and access control documentation):
- Install Tailscale on an always-on device at home (a NAS, the Home Assistant host, a small Linux computer) and sign in. On a Synology, note Tailscale's warning that "the Tailscale package published in the Synology Package Center is no longer supported"; Tailscale's page explains the manual install from its own package server.
- Install the app on your phone and laptop and sign in to the same tailnet. You can now reach the home device by its Tailscale address.
- To reach the rest of the network, advertise its subnet from the home device:
sudo tailscale set --advertise-routes=followed by your home range, such as 192.168.1.0/24. On Linux, turn on IP forwarding first ("IP forwarding is required to use a Linux device as a subnet router"), with the device's firewall denying forwarded traffic by default, as Tailscale advises. - Approve the route in the admin console: Machines, the device, Subnets.
- Edit the access policy. The default "enables communication between all devices within the tailnet"; narrow it so each person reaches only what they need, then check your path from outside the home.
ZeroTier
ZeroTier works the same way. When a peer shows the RELAY state, its documentation says "packets are bouncing through our root servers" because a direct connection can't be made, and "side effects of RELAYING are increased latency and possible packet loss." zerotier-cli peers (version 1.4 and later) shows which peers are DIRECT and which are RELAY. ZeroTier's router tips say "symmetric NAT is extremely hostile to peer to peer traffic", and that IPv6 "can greatly improve direct connection reliability if supported on both ends of a direct link". If your connection has IPv6, leave it on.
For whole-network access, ZeroTier's routing guide uses a Linux machine on your LAN, which it calls "the simplest pattern for getting remote access to your LAN": it "doesn't require access to the LAN's router", but you "can't initiate connections from the LAN to an external ZeroTier client." The steps mirror a Tailscale subnet router: join the machine and your phone to one network, add a managed route at my.zerotier.com that sends your home subnet to the machine's ZeroTier address (a slightly larger route, a /23 for a /24, keeps devices at home on the direct path), then turn on IP forwarding and add the guide's iptables rules. The free Personal plan allows "10 devices, one network" for "Personal, non-commercial use".
WireGuard to a rented server
If you'd rather not depend on a mesh VPN company, rent a small virtual private server (VPS) with a public IPv4 address as the meeting point. A device at home connects out to it and keeps the connection open; your phone connects to the same server, which passes traffic between them. It's the most work of any option.
- Your phone Hotel Wi-Fi or mobile data, WireGuard app
- Rented server (VPS) Public IPv4 address, one UDP port open; every packet passes through here
- Provider's CGN Lets the traffic in only because home opened the connection; keepalives hold the mapping open
- Your router No port forward needed
- Home WireGuard peer A Linux machine or NAS that routes to your network
- NAS, Home Assistant or cameras Private addresses, never exposed
Two WireGuard behaviors make this work. First, WireGuard learns where a peer is from its traffic: the wg manual says a peer's endpoint "will be updated automatically to the most recent source IP address and port of correctly authenticated packets from the peer." The server doesn't need to know your home's changing shared address; only the home side is configured with the server's address. Second, WireGuard is quiet by default ("WireGuard tries to be as silent as possible when not being used"), and a NAT forgets a mapping that carries no traffic. The fix is PersistentKeepalive, which sends "an authenticated empty packet to the peer for the purpose of keeping a stateful firewall or NAT mapping valid persistently." WireGuard's quick start calls 25 seconds "a sensible interval that works with a wide variety of firewalls."
That leaves margin: RFC 4787 says a NAT's UDP mapping timer "MUST NOT expire in less than two minutes" and recommends "five minutes or more", and RFC 6888 applies those rules to carrier-grade NATs. We found no provider that publishes its timeout, so keep 25 seconds.
Setup outline (from WireGuard's quick start and wg manual; distribution-specific steps vary):
- Rent a VPS with a public IPv4 address. Allow one UDP port for WireGuard (51820 is the usual default) and SSH with keys, nothing else.
- Install WireGuard on the server, on one always-on Linux machine at home, and on your phone. Generate a key pair on each (
wg genkey, thenwg pubkey). - On the server, add both peers.
AllowedIPsis a routing table and an access list in one: addresses "from which incoming traffic for this peer is allowed and to which outgoing traffic for this peer is directed." Give the home peer its tunnel address plus your home subnet, and give the phone only its tunnel address. Turn on IP forwarding. - On the home machine, set
Endpointto the server's address and port,AllowedIPsto the tunnel range andPersistentKeepalive = 25, then route (or NAT) from the tunnel to your home network. - On the phone, set the server as the endpoint and list the tunnel range and your home subnet in
AllowedIPs, so only home-bound traffic uses the tunnel.
A variation, which Jellyfin documents, is a reverse proxy on the server forwarding HTTPS through the tunnel to one app. People then need no VPN app, but the app's login page is on the internet.
Cloudflare Tunnel, with Access as the front door
Cloudflare Tunnel runs a small program, cloudflared, on a machine at home. Cloudflare says it "establishes outbound, post-quantum encrypted connections to Cloudflare", with "no inbound ports or firewall changes required", and that Tunnel is "available on all plans". You map a public hostname on your own domain to a local service; Cloudflare calls this a published application, and "public hostname routes proxy traffic through Cloudflare." Before you can publish anything, "you must add a website to Cloudflare", so you need a domain.
It's built for HTTP. Published applications can point at HTTP, HTTPS, TCP, SSH, RDP and SMB services (UDP isn't on the list), but "non-HTTP services require installing cloudflared on the client for end users to connect", and for long-lived TCP connections Cloudflare says to "use Client-to-Tunnel instead". That's its private-network mode, in which "end users connect to Cloudflare's global network using the Cloudflare One Client": a VPN by another name, and a mesh VPN is simpler.
Not for video. Cloudflare's tunnel documentation points to its service terms, which say that, unless you're an Enterprise customer, Cloudflare "offers specific Paid Services" (it names the Developer Platform, Images and Stream) "that you must use in order to serve video and other large files via the CDN", and that it may restrict CDN use by those who serve video without them. A Plex or Jellyfin server published through a tunnel falls into exactly that case.
Put Access in front. A published hostname is public. Cloudflare Access adds "an authentication layer between the end user and your origin server", and "Access is deny by default," so only people matching an Allow policy get through. Its policy documentation flags a common mistake: admitting everyone with a valid email login, such as a one-time PIN, lets in anyone with an email address, so name specific addresses or a group. If you use a phone app with the service, check that it can get through Access's sign-in; the Cloudflare pages we read don't cover individual apps.
Setup outline (from Cloudflare's tunnel and Access documentation):
- Add your domain to Cloudflare.
- In the dashboard, go to Networking, Tunnels, and create a tunnel.
- Run the install command it gives you on an always-on machine at home and wait for the tunnel to show as connected.
- On the Routes tab, add a published application: a subdomain, and the local service's address as the Service URL (Cloudflare's example is
http://localhost:8000). - Create an Access application for that hostname with an Allow policy naming only your people.
- For Home Assistant, which blocks requests from a reverse proxy it doesn't trust "by design", turn on Trust X-Forwarded-For under Settings, System, Network and add the machine running
cloudflaredas a trusted proxy.
Cost: Cloudflare lists its Zero Trust Free plan at "$0 forever" with a "50 user limit". The domain is a separate cost.
IPv6 inbound, where the provider supplies it
Carrier-grade NAT is an IPv4 mechanism. With IPv6, a connection can reach a device at home directly, with no relay and no third party. Two conditions apply, both covered in CGNAT explained: your router's IPv6 firewall has to allow the connection, and the network you connect from has to have IPv6 too. What Starlink and T-Mobile Home Internet, whose own routers can't forward ports, document:
- Starlink "supports native IPv6 across all Starlink routers, kit versions, and service plans" and delegates "a /56 IPv6 prefix via DHCPv6-PD". But "Starlink WiFi routers do not support port forwarding or firewall rules for IPv4 or IPv6", and Starlink says "customers needing inbound traffic should consider using a third-party router". In describing its public IPv4 option, Starlink says a reservation system keeps addresses and the IPv6 prefix through reboots, but "relocating the Starlink or software updates may change these addresses."
- T-Mobile Home Internet's device-connection page mentions IPv6 only to say that "third-party VOIP services and devices that support IPv6 are compatible". We found no T-Mobile documentation of inbound IPv6 or IPv6 firewall settings, and its gateways "do not have the ability to enable and disable NAT/port forwarding" or bridge mode. Don't count on inbound IPv6 there until a test from outside works.
Two details trip people up. Devices use temporary privacy addresses that change over time (RFC 8981 builds them from "randomized interface identifiers"), so point firewall rules and DNS at the device's stable address. And the prefix can change, as Starlink warns, so use dynamic DNS that updates an AAAA (IPv6) record.
Setup outline:
- Confirm your router shows an IPv6 prefix on its WAN status and that the target device has a global IPv6 address (not one starting with fe80).
- Find the device's stable address, not a temporary one.
- Check that your router's IPv6 firewall is on, then add a rule allowing one port to that one address. RFC 6092, the IETF's informational advice for home gateways, recommends turning away unsolicited inbound connections by default but also allows an open "transparent mode" as the default; keep the filtering on.
- Publish an AAAA record through dynamic DNS.
- Test from a network you know has IPv6.
The safest thing to open on IPv6 is a VPN port, such as your router's WireGuard server if its maker documents IPv6 support, rather than the app itself.
Ask the provider for a public IPv4 address
This removes the problem rather than working around it. Home Assistant's documentation tells readers to check whether the provider gives them a "dedicated IP, instead of one shared with other users via a CG-NAT", and warns that "some, if not most ISPs will require you to pay an extra fee." Ask for a public IPv4 address that isn't behind carrier-grade NAT; "static" only means it doesn't change. The provider table in CGNAT explained lists who offers one: Starlink on its Local and Global Priority plans and some fiber providers do; T-Mobile Home Internet says it "does not have the ability to change IP from dynamic to static."
Once you have one:
- Make sure your own router holds it. On Starlink that means your own router, because Starlink's router "does not support port forwarding". Elsewhere, fix any double NAT with bridge mode or passthrough.
- Turn on your router's VPN server. On UniFi, Ubiquiti's WireGuard server uses UDP 51820 by default, and Ubiquiti recommends running it "on a UniFi gateway that has access to a public IP address."
- If the address can change, set up dynamic DNS so your VPN profile points at a name.
Prefer a VPN server over forwarding ports to each app: one encrypted port is exposed instead of every login page.
Vendor clouds: UniFi, Synology and Home Assistant
If you already own the hardware, the maker's own remote access may be the least work. The trade-off is lock-in: each depends on that maker's hardware or service, and QuickConnect and Home Assistant Cloud reach only the maker's own apps.
UniFi Teleport and SD-WAN
Ubiquiti calls Teleport "a zero-configuration VPN" for UniFi gateways and Cloud Gateways running UniFi OS, built on WireGuard and used through the WiFiman app. You send an invitation, which "expires in 24 hours and can only be utilized by a single device at a time". Ubiquiti's FAQ says Teleport "can be used when both the UniFi gateway and client are behind NAT", unlike traditional VPNs. But Ubiquiti doesn't say whether traffic is relayed, doesn't mention carrier-grade NAT, and notes that "Teleport requires an IPv6 connection on your gateway's WAN in some circumstances" without saying which. Treat it as likely to work, not guaranteed. You revoke access from the Teleport client in Client Devices.
UniFi's regular WireGuard server, by contrast, needs a port forward on any upstream router, so it doesn't work behind CGNAT. Ubiquiti's site-to-site SD-WAN (Site Magic) avoids "concern for subnet overlap or NAT traversal", but its mesh setup requires that "at least one gateway must have a public IP address". A CGNAT home can join another site that has one; two CGNAT sites can't connect this way. Choosing a gateway is covered in which UniFi gateway.
Synology QuickConnect
Synology says QuickConnect "allows client applications to connect to your Synology NAS via the Internet without the hassle of setting up port forwarding rules", for DSM and Synology's packages, including Synology Photos, Synology Drive, File Station and Surveillance Station. Behind CGNAT, turn on the relay option under Control Panel, External Access, QuickConnect, Advanced: the connection "will be relayed via Synology Relay Server when direct QuickConnect access to the Synology NAS is not possible", and Synology warns that a relayed connection "may be slow due to longer network latency." The same Advanced settings let you turn QuickConnect on or off per application or service; turn off everything you don't use away from home. Whatever stays on can be reached by anyone who has your QuickConnect ID, which Synology describes as "a permanent and easily memorized server ID", so turn on two-factor authentication; DSM can enforce it for all users under Control Panel, Security, Account.
Home Assistant Cloud (Nabu Casa)
Nabu Casa, which runs the service, explains why no port is needed: your Home Assistant connects to its proxy servers, which "operate at the TCP level, forwarding all encrypted data", and your data "stays encrypted from your Home Assistant instance to your device, even when passing through our servers." It's direct about the trade-off: with remote access on, "your Home Assistant system is open to the wider internet", so it asks for a strong password and "two-factor authentication in Home Assistant for all user accounts." It lists $6.50 a month or $65 a year (USD, tax not included), and says the service becomes Home Assistant Link on December 2; Home Assistant's announcement ties the rename to its December 2026 release.
Security: what to expose and how
- Prefer a private path to a public page. With a mesh VPN or a WireGuard relay, nothing at home answers a device that isn't enrolled. A public hostname (Cloudflare Tunnel, Funnel, a reverse proxy) puts a login page on the internet. Jellyfin's networking guide is blunt: "Opening a port directly to the Internet is therefore insecure and not recommended."
- Never publish an admin interface. Router admin pages, the NAS's DSM login and camera recorders belong behind a VPN or, at minimum, behind Cloudflare Access with a named allow list. QuickConnect and Home Assistant Cloud do put a sign-in page online, which is why two-factor authentication isn't optional there.
- Turn on multi-factor authentication everywhere it exists. Home Assistant's security checklist starts with a strong, unique password and multi-factor authentication. Tailscale says "there are no Tailscale passwords": sign-in goes through an identity provider such as Apple, Google, GitHub or Microsoft, and multi-factor authentication turned on there will "apply to all your apps, including Tailscale."
- Give least privilege. Tailscale's default policy lets every device reach every other, so write rules: advertise only the subnets you need and limit which devices in them each person can reach. Jellyfin notes that keeping Tailscale clients from reaching each other "needs extra, complex configuration". Remove devices and Teleport clients you no longer use.
- Keep things updated. Nabu Casa says that when Home Assistant versions have known security issues, "we block their connection" to its remote access. An exposed app is only as safe as its last update.
Frequently asked questions
Is Tailscale slower than a direct connection?
Not when it connects directly: the traffic then goes straight between your devices over UDP. When both ends are behind a hard NAT, it relays, through a peer relay if you've set one up and otherwise through Tailscale's DERP servers, which Tailscale says are generally slower and may offer lower maximum throughput. Run tailscale ping from outside your home to see which path you have.
Can I run a WireGuard server on my router behind CGNAT?
Not one that phones outside your home can reach. A VPN server needs an inbound port, and carrier-grade NAT drops unsolicited inbound connections. Ubiquiti, for example, says its WireGuard server needs a port forward on any upstream router. Use a mesh VPN, a WireGuard tunnel from home to a rented server, IPv6 if you have it, or a public IPv4 address from your provider.
Should I use Cloudflare Tunnel for Plex or Jellyfin?
No. Cloudflare's service terms require a specific paid service to serve video and other large files through its CDN unless you are an Enterprise customer, and its tunnel documentation points to those terms. A mesh VPN suits your own household; a public IPv4 address or a reverse proxy on a rented server suits sharing with others.
Does IPv6 get me around CGNAT?
It can, for direct connections, if your provider supplies IPv6, your router can allow the inbound connection in its IPv6 firewall, and the network you connect from also has IPv6. Starlink provides IPv6 on every plan but its own routers can't set firewall rules, so you need your own router. We found no T-Mobile documentation of inbound IPv6.
Do I need a static IP address?
You need a public one; static is a convenience. A public address that changes works with dynamic DNS. Ask your provider specifically for a public IPv4 address that isn't behind carrier-grade NAT.
Sources
Read on November 7, 2026.
- Tailscale: Connection types (direct, DERP and peer relay; tailscale status and tailscale ping)
- Tailscale: DERP servers (relays can't decrypt traffic; nearest relay chosen)
- Tailscale: Peer relays (version 1.86, configurable UDP port)
- Tailscale: Subnet routers and Exit nodes
- Tailscale: Access control lists (default allow-all policy; least privilege) and Identity providers (no Tailscale passwords; MFA at the provider)
- Tailscale: Funnel (ports 443, 8443 and 10000; TLS only; bandwidth limits)
- Tailscale: Synology (Package Center version no longer supported)
- Tailscale: Pricing (Personal plan: free, up to 6 users, unlimited user devices; subnet routers, exit nodes, peer relays and Funnel included)
- ZeroTier: Relaying, Router tips and Route between ZeroTier and physical networks
- ZeroTier: Pricing (Personal plan: free, 10 devices, one network, non-commercial use)
- WireGuard: Quick start (NAT and firewall traversal persistence) and WireGuard: Overview (cryptokey routing, roaming)
- wireguard-tools: wg(8) manual page (PersistentKeepalive, AllowedIPs, Endpoint)
- IETF RFC 4787: NAT behavioral requirements for unicast UDP (REQ-5, UDP mapping timers) and RFC 6888: Common requirements for carrier-grade NATs
- Cloudflare: Tunnel overview and Tunnel routing (published applications, private networks, large files)
- Cloudflare: Protocols for published applications (non-HTTP services need cloudflared on the client)
- Cloudflare: Connect private networks with cloudflared (Cloudflare One Client)
- Cloudflare: Create a tunnel (dashboard)
- Cloudflare: Self-hosted public application (Access) and Access policies
- Cloudflare: Service-specific terms, application services (video and large files on the CDN)
- Cloudflare: Zero Trust plans (Free plan, 50-user limit)
- Starlink: What IP address does Starlink provide? and Can I port forward with the Starlink router?
- T-Mobile: Connect your devices to T-Mobile Internet (VoIP and IPv6, port forwarding, bridge mode, static IP)
- IETF RFC 6092: Simple security in IPv6 home gateways and RFC 8981: Temporary address extensions for IPv6 autoconfiguration
- Ubiquiti: UniFi Gateway, Teleport VPN, WireGuard VPN server, Introduction to VPNs and SD-WAN with UniFi Site Manager (read through Ubiquiti's public Help Center API)
- Synology: QuickConnect (DSM help), QuickConnect white paper (QuickConnect ID) and Security: Account (enforcing 2-factor authentication)
- Home Assistant: Remote access and Securing your Home Assistant
- Nabu Casa: Remote access deep dive and Remote access security aspects
- Nabu Casa: Home Assistant Link pricing ($6.50 a month or $65 a year; rename on December 2) and Home Assistant blog, October 2, 2026 (rename in the December 2026.12 release)
- Jellyfin: Tailscale and Networking