TL;DR — range is coverage. Fix coverage first, then chase speed.
- Placement beats power: Central, high, unobstructed placement helps more than max transmit power.
- 6 GHz is fast, not far: Great for same/adjacent rooms; let 5 GHz handle distance and 2.4 GHz carry IoT.
- Mesh with wired backhaul is the gold standard for bigger or complex homes.
- One SSID, WPA3, band steering for clean roaming; avoid mixing random extenders.
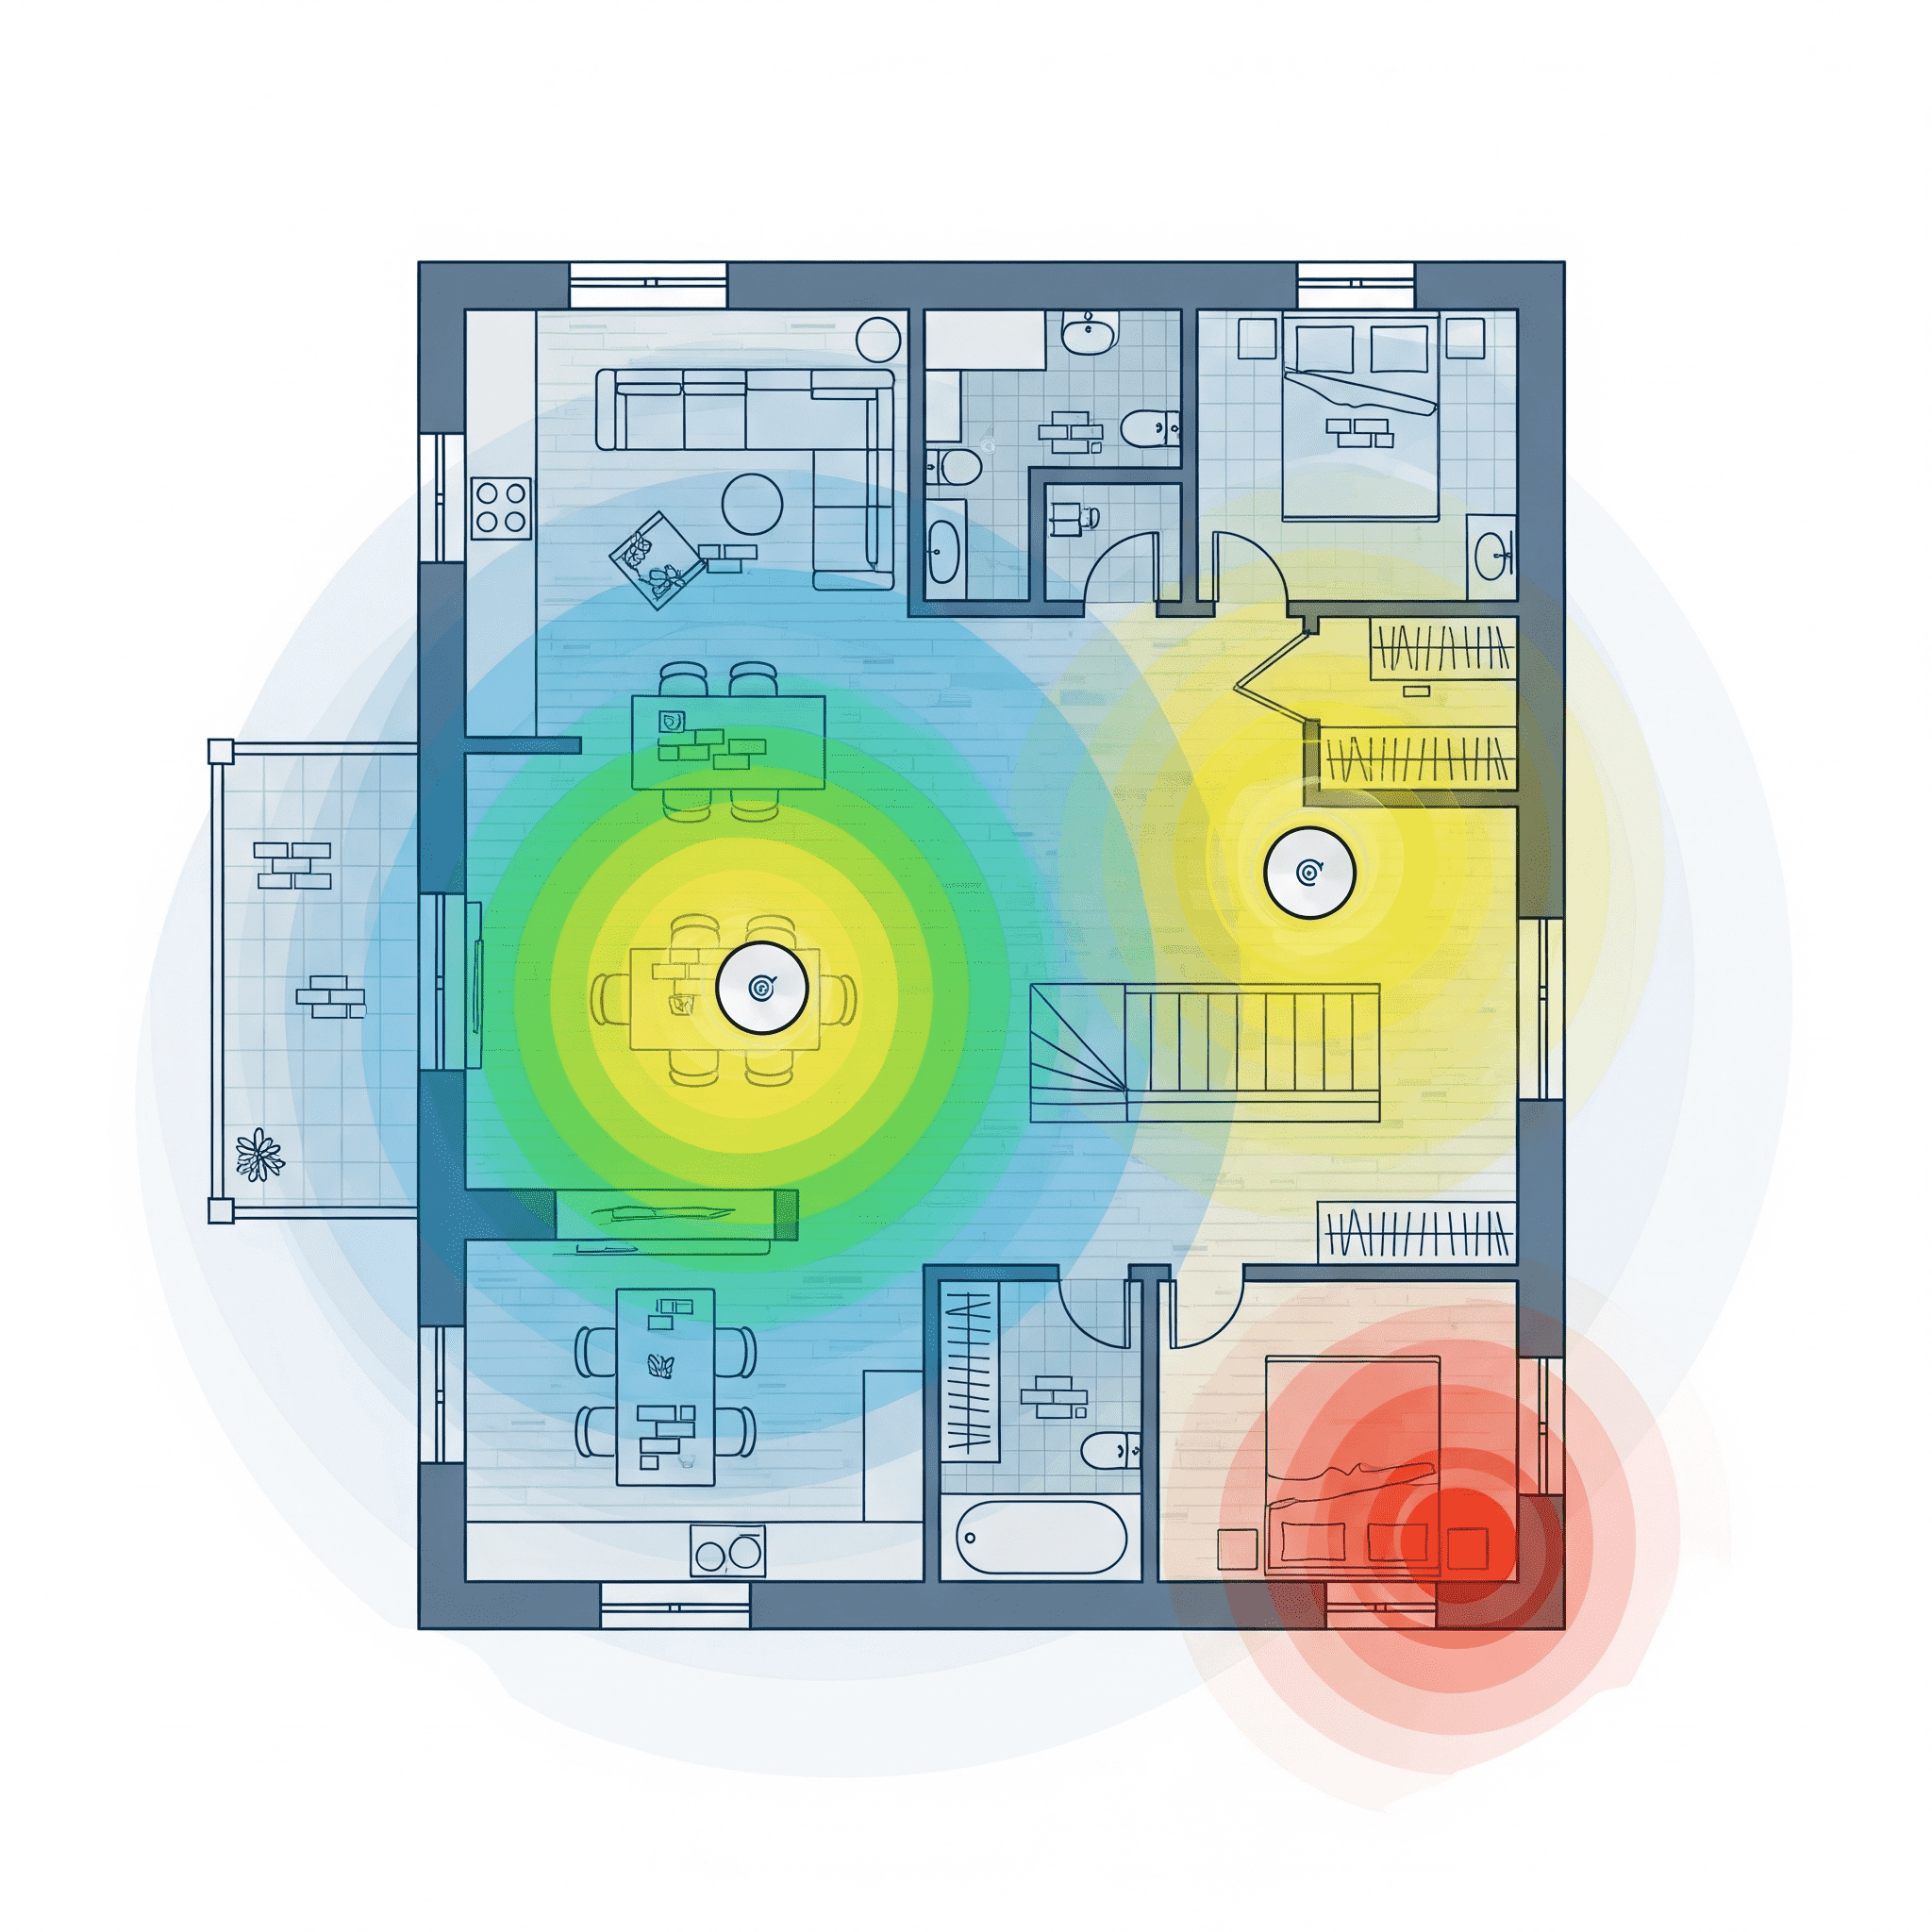
Rule: If a room needs reliable Wi-Fi, put a radio near that room or wire it. Range isn’t a spec number—it’s about where the radios are.
Symptoms: how dead zones show up
- Video calls stutter only in certain rooms or at certain angles.
- Streaming apps drop to SD or rebuffer on one side of the house.
- Smart devices (cams/doorbells) go offline or delay notifications.
- Speed tests swing widely when you move 10–15 ft or close a door.
Range & attenuation 101
Different bands trade reach for capacity. Materials add loss (“attenuation”). Treat these as guidelines:
| Band | Strengths | Limitations |
|---|---|---|
| 2.4 GHz | Longest reach; penetrates walls well; fine for IoT | Congested, lowest capacity; not ideal for 4K streams/calls |
| 5 GHz | Balanced reach/capacity; good through a couple walls | Falls off through heavy materials; DFS may shift channels |
| 6 GHz | Highest capacity (Wi-Fi 7 up to 320 MHz), low latency | Shortest reach; shines in same/adjacent rooms |
| Material | Typical impact on Wi-Fi |
|---|---|
| Drywall/wood interior wall | Low–moderate loss per wall |
| Brick/concrete | High loss; multiple walls can kill 5/6 GHz |
| Tile bathroom + mirrors | High reflection/absorption; frequent dead zones |
| Metal appliances/ducts | Severe reflection/shadowing; don’t place routers nearby |
| Low-E glass / foil-back insulation | Very high loss; plan mesh nodes around these |
5-minute home coverage audit
- Mark usage rooms: office, TV room, bedrooms, workshop.
- Map walls/floors: note concrete/brick, tile baths, metal closets.
- Stand where you use Wi-Fi: run a quick speed/latency test (or note bars/dBm).
- Draw weak spots: anywhere signal is <≈ −67 dBm or latency spikes.
- Check wiring: can you run Ethernet or MoCA between likely node spots?
Fixes that work (ordered by impact)
- Move the router to a central, high, open location. Avoid cabinets, TV backs, aquariums, and corners.
- Go mesh for size/complexity: 2–3 nodes for multi-story or >1,800 sf. Prefer wired backhaul (Ethernet/MoCA).
- Tune node spacing: ~30–40 ft line-of-sight; reduce through heavy walls/floors. Aim for −55 to −65 dBm between nodes.
- Wire priority rooms: desk and media center on Ethernet; frees Wi-Fi airtime and stabilizes uplink.
- One SSID + WPA3: let band steering roam clients between 2.4/5/6 GHz. Separate SSIDs only for troubleshooting.
- Retire extenders: Half-duplex repeaters usually cut throughput and add latency. Use proper mesh/APs.
- Update firmware to improve 6 GHz/MLO performance and roaming.
Pro tip: If you can wire only one run, wire between the two most distant mesh nodes. It frees the air for client traffic everywhere.
Channels & widths that help range
- 6 GHz: Leave enabled. Enjoy 320/160 MHz near a node; perfect for modern phones/laptops.
- 5 GHz: If crowded, try 80 MHz (more stable through walls than 160 MHz). DFS can help, but may change channels.
- 2.4 GHz: Keep for IoT and far corners; use channels 1/6/11 only to avoid overlap.
- Tx power myth: Max power can hurt roaming (AP hears you, you can’t reply). Balanced power + good placement wins.
Test & tune: quick method
- Place router/nodes; update firmware; enable 6 GHz and WPA3.
- Walk your marked rooms and run speed + latency tests (or note signal level).
- Move nodes 5–10 ft or adjust height; re-test. Look for better jitter as much as Mbps.
- Wire the desk/media center if spikes persist during uploads/streams.
- Lock in changes; re-check two problem rooms monthly.

RouterHaus Editorial
We test real networks in real homes so you buy once and get it right—no jargon, no fluff.